Creating Standalone Applications
Introduction
On OS X, applications are special directories known as "bundles." This allows you to create stand-alone applications running SuperCollider code that are opaque, in the sense that the user does not need to install SuperCollider, run SuperCollider code, or even know that SuperCollider is involved. (Of course, your application must be open-source and comply with the GPL.) This is useful for distributing applications to the general public, or for creating special-purpose applications for your own use.
There are two ways of making standalone applications:
A. Modifying an existing Standalone Template.app by editing the contents in its folder,
which can be done without requiring XCode or any other development environments,
described in Modifying_Standalones, or
B. Creating a standalone application from scratch, as described below.
Creating a standalone application
1- Obtain a copy of the SuperCollider source code. The easiest way to do so is to download the latest source release from SourceForge:
http://sourceforge.net/projects/supercollider/
2- Open the Language.xcodeproj project in Xcode.
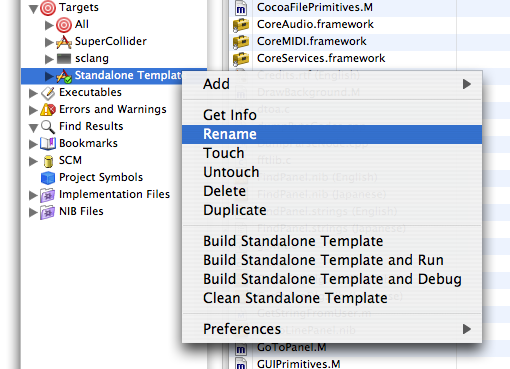
3- Rename the "Standalone Template" target by control-clicking it and choosing "Rename". This target name is used for both the .app name and for the name presented in the menu bar.

4- Customize the "Standalone Resources" directory, which is located at the root of the SuperCollider source directory. Any files you put in this directory will overide the files placed in the standalone application. For example if you wanted to create your own version of Array.sc you would need to create the following path (creating folders where necessary):
Standalone Resources/SCClassLibrary/Common/Collections/Array.sc
Your version of Array.sc will now overide the default. Similarly you can replace application resources to customize your application. "Standalone Resources/SCcube.icns" can be overridden to provide a custom icon. "Standalone Resources/English.lproj/MainMenu.nib" can be overriden to provide a custom menu bar and "Standalone Resources/English.lproj/Credits.rtf" can be overidden to provide a new about box. The "Standalone Resources" directory by default comes with a small demo application that puts up a window with a button that generates a tone when pushed.
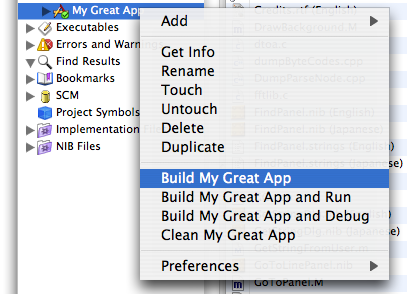
5- Build the standalone application by control-clicking on the target and choosing "Build [target name]". This will place your standalone app in the build directory. It is recommended that you develop your application fully in a normal SuperCollider environment before creating a standalone application.

Adding your own behavior
You've now created an application that behaves exactly like SuperCollider. To run your own code on launch and simulate an ordinary application, you'll need to modify the startup-related methods, which are overwritten in (Standalone Resources)/SCClassLibrary/modifyStartup.sc.
Here's an example (the same code used by the SC_StandAlone target):
+ OSXPlatform {
startupFiles {
// var filename = "startup.rtf";
// ^[this.systemAppSupportDir +/+ filename, this.userAppSupportDir +/+ filename];
// look for startup files inside the app Contents directory
var filename = "startup.*";
^(String.scDir +/+ filename).pathMatch;
}
startup {
Document.implementationClass.startup;
// make a server window for the internal if you like
Server.internal.makeWindow;
// Server.local.makeWindow;
// uncomment if you use a startup file
// this.loadStartupFiles;
// uncomment if you have multiple help files
// Help.addToMenu;
}
}
+ Main {
startup {
platform = this.platformClass.new;
platform.initPlatform;
super.startup;
GUI.fromID( this.platform.defaultGUIScheme );
GeneralHID.fromID( this.platform.defaultHIDScheme );
// Set Server.default and the 's' interpreter variable to the internal server.
// You should use the internal server for standalone applications --
// otherwise, if your application has a problem, the user will
// be stuck with a process, possibly making sound, that he won't know
// how to kill.
Server.default = Server.internal;
interpreter.s = Server.default;
// some folder paths that should point inside the app's Contents folder
SynthDef.synthDefDir = String.scDir +/+ "synthdefs/";
Archive.archiveDir = String.scDir;
this.platform.startup;
// from here on, you should customize what should happen...
StartUp.run;
// One can boot the server, then use .load to evaluate a file
// OR - put things into a class... like the SCSA_Demo
"Welcome to Standalone Demo made with SuperCollider, type cmd-d for help.".postln;
Server.default.boot;
Server.default.waitForBoot({
SCSA_Demo.new("The Cheese Stands Alone", Rect(400, 400, 300, 200), interpreter.s).front;
// (String.scDir.dirname ++ "/MFBSD.rtf").load;
});
// close post window if user should not have it
// Document.listener.close
}
}
The class SCSA_Demo contains the entire application, including the main window. This is the tidiest way to work, and requires the least modification to SuperCollider. If you don't want to write a class, you can execute an .rtf file instead:
load(String.scDir ++ "/myapp.rtf");
However, any sizable application will benefit from encapsulation in classes.
Note that the example uses the internal server. This is part and parcel of keeping the application stand-alone; it shouldn't call extraneous processes behind the user's back that will persist if the application fails. If you need to use the local server for some reason, make sure scsynth is in your resources folder.
Managing multiple standalone applications
To manage several standalone applications simply create several targets and several resources directories. The resources directories should be named according to "[target name] Resources". If a resources directory is found when building that matches the target name, that directory will be used instead than the default "Standalone Resources" directory.